
The 2024 Guide for Blogging on Squarespace: How to Blog
Are you looking for an efficient way to create and manage your blog? Squarespace may be just the solution for you.
You can quickly develop a creative, customized blog with the powerful website-building platform Squarespace. How to blog on the platform is pretty straightforward, and this comprehensive guide will help you get up and running on Squarespace, whether you’re a novice or an experienced blogger.
This post outlines the steps for how to blog on Squarespace. We’ll also review the features that make blogging easier with Squarespace, such as embedded media, and discuss how to optimize your post for search engine visibility. Additionally, we’ll offer some guidance on SEO to ensure your blog receives traffic once it’s live.

Is Squarespace Suitable for Blogging? (And Why?)
Yes, it is.
Squarespace is an all-in-one platform that makes creating a beautiful, professional website or blog easy. Whether you’re a budding blogger or an experienced webmaster, Squarespace has something for everyone.
Here are just a few reasons why Squarespace is suitable for blogging:
Squarespace offers a wide selection of templates designed specifically for blogging. From modern and minimalistic layouts to classic designs, you can customize any layout to look exactly how you want.
With the new drag-and-drop website editor, Fluid Engine, creating and updating a blog post is simple and intuitive. You don’t need any technical knowledge or coding skills to get your blog up and running in no time.
Squarespace has powerful tools that streamline your workflow and help you manage every aspect of your blog efficiently. For instance, with access to detailed analytics data like page views, you can track the performance of your blog over time.
Whether starting from scratch or migrating an existing blog into Squarespace, this platform can help make it easier to create and maintain beautiful blogs.
How Do I Use Squarespace for Blogging? (A Step-by-Step Guide)
This section will walk you through the steps you need to take to start blogging on Squarespace, including:
Creating a Squarespace account
Adding a blog page
Creating and publishing a blog post
Step #1: Creating a Squarespace account.
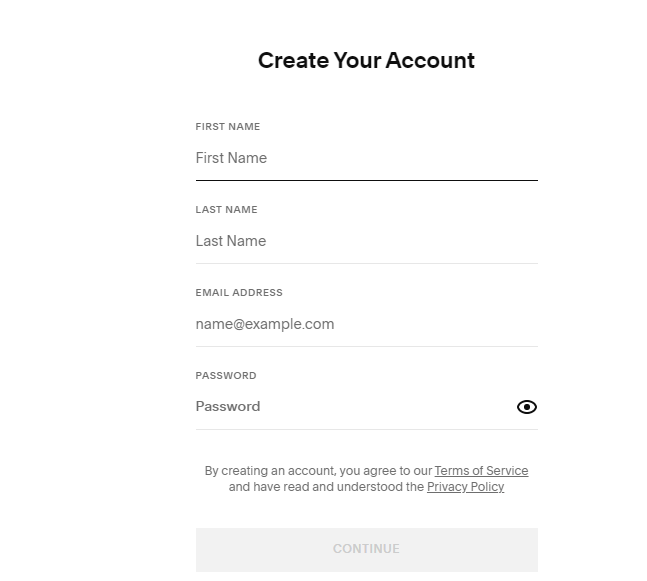
Before you create your blog, the first step is to create a Squarespace account. It’s free and easy to do; you only need to head to Squarespace.com and select a template. Next, you’ll be asked for basic information like your name, email address, and password.
Once you fill out the details, click “Continue,” and you’ll be taken to the home page of your new Squarespace account. You can also log in easily with your Google account — just select the option.
Step #2: Adding a blog page.
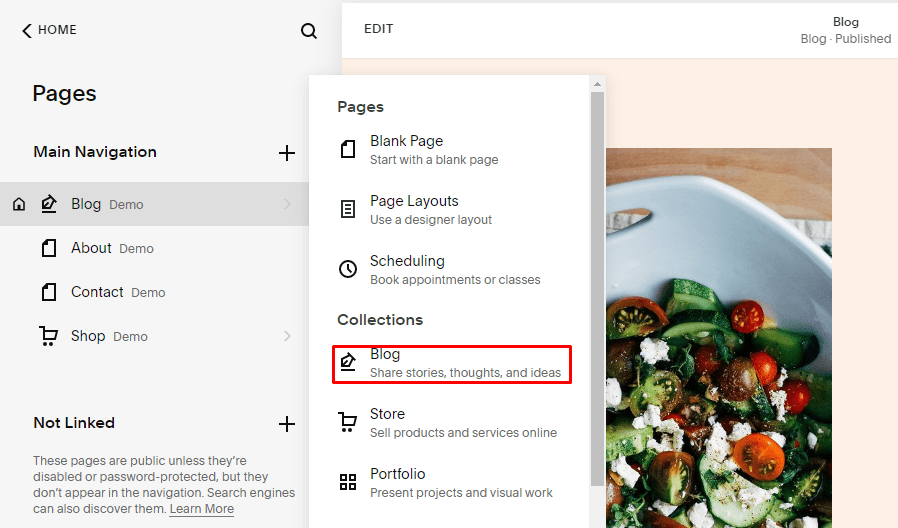
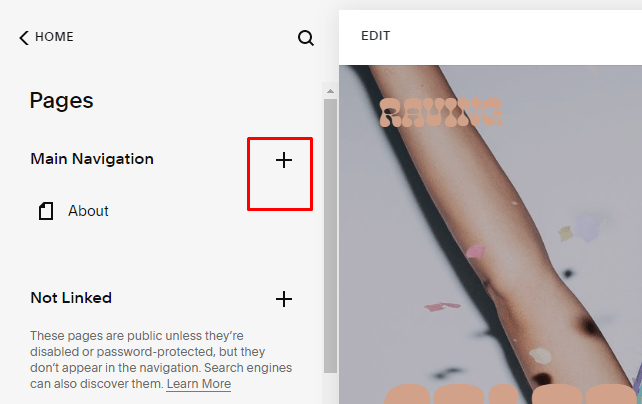
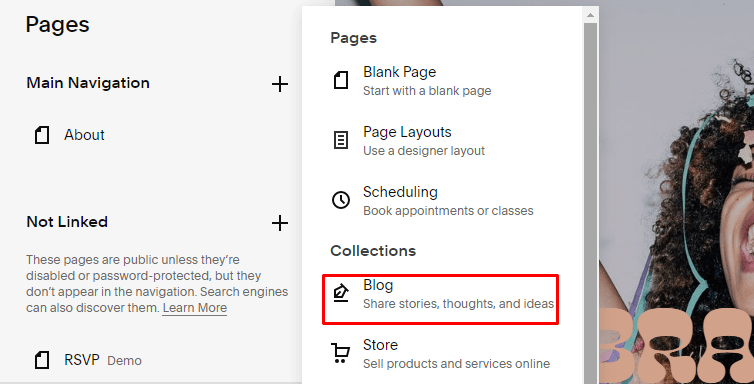
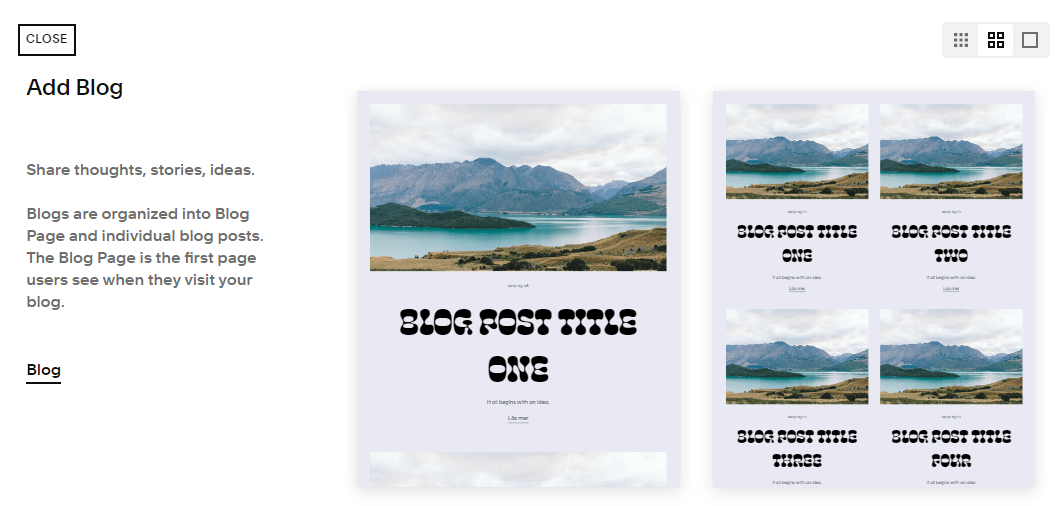
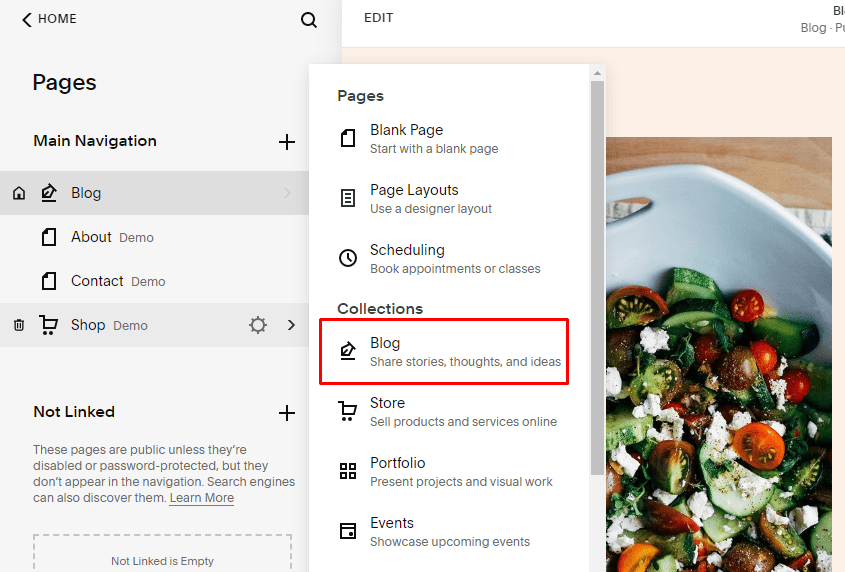
Before you can start blogging on Squarespace, you’ll need to add a blog page to your website. You can do this easily by going to the “Pages” tab in your sidebar and selecting the “+” (plus sign) icon. You should see the option for “Blog” listed as one of the page types under “Collections.” Select this option and choose a blog layout from the templates.
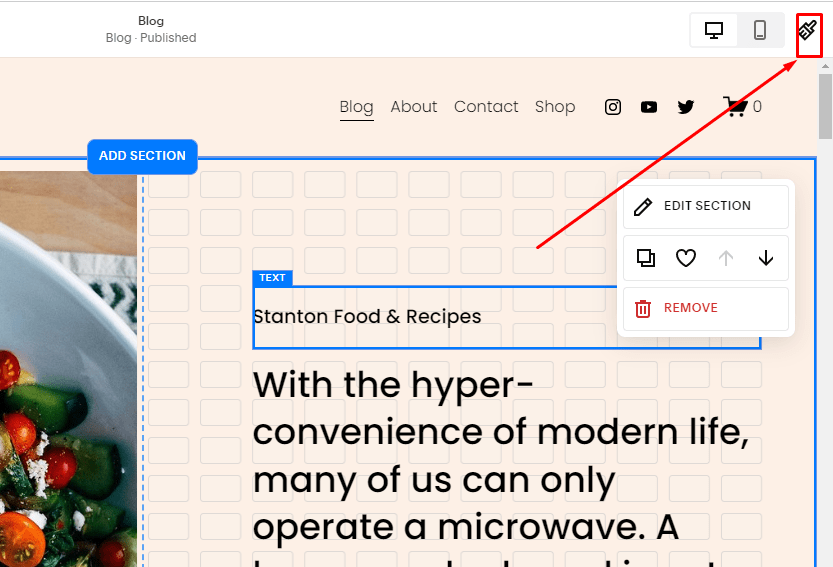
Next, you’ll be able to customize how your blog looks by adjusting its style — you can change the title size, font family, color scheme, and more. To do this, select the “Brush” icon while editing a blog post page and navigate to “Fonts.”
We have a detailed guide on how changing fonts on Squarespace works, so we’ll suggest you check it out for a more comprehensive idea.
Once your blog style is set up, all that’s left is to start writing your first blog post.
Here are some tips for getting started:
Identify your reason for blogging in the first place (to build an online brand, generate income, document your life experiences, etc.)
Brainstorm ideas for topics that are related to your product or niche.
Identify what type of content resonates with your audience.
Create a content calendar if you plan on publishing regular blog posts.
Research keywords that will help optimize each post.
Set a goal for how often you plan on publishing blogs.
Find other blogs in your niche as inspiration.
Once you’ve got started, check out Spark to improve your navigation bar.
Step #3: Creating and publishing a blog post.
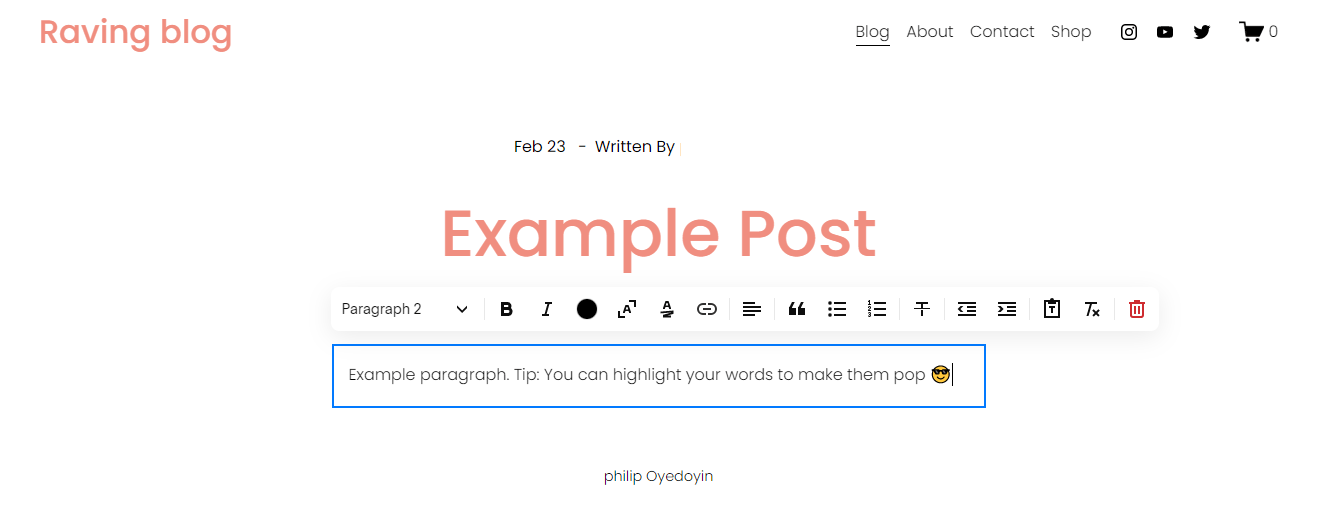
Once you’ve set up your blog page, it’s time to get down to the nitty-gritty of creating a blog post. This is the fun part — where you can let your creativity shine and craft a post that puts your best foot forward.
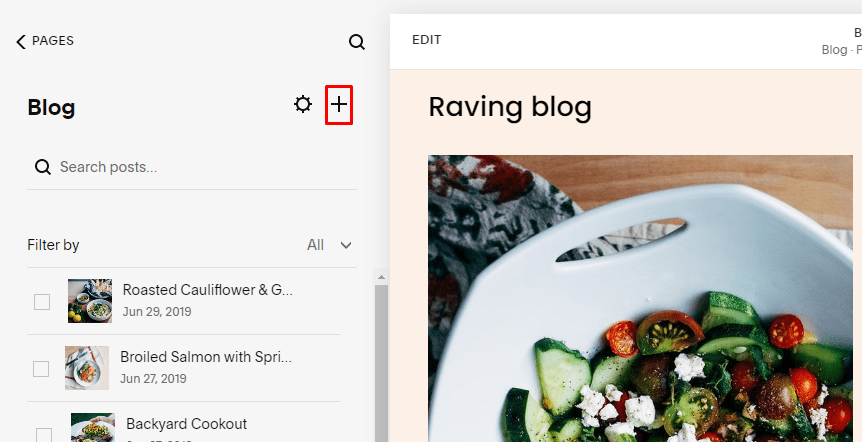
To create a blog post, head to your Squarespace account menu's “Blogs” section. Then, click on the “+” (plus sign) icon to create a new blog post.
You can now start typing your content into the “Body” field. Also, you can use various formatting techniques like adding headings, bolding or italicizing text, or creating bulleted lists while you’re at it.
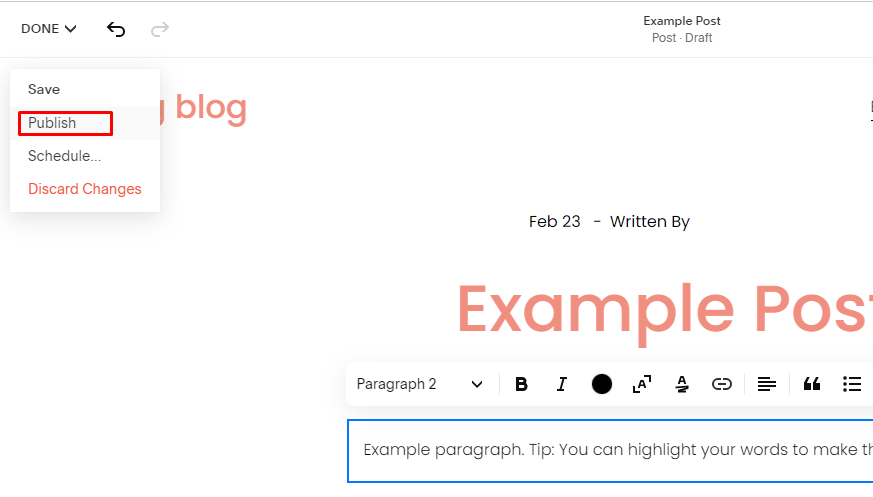
Once you’ve crafted your post and ensured everything looks as it should, it’s time to publish!
Note: There are certain aspects of your blog pages you may want to tweak before publishing, and may require adding content blocks. We’ll expand on this in a bit!
In Squarespace’s left sidebar menu, hover over “Done” and click “Publish.” Now, anyone who visits your blog will be able to see this post live.
However, before publishing any post, it’s crucial it adheres to our Squarespace SEO checklist. This carries more weight when you consider that 71% of bloggers report SEO to be the most vital traffic source to their blog. If you’re not ready to get into the technicalities of SEO (search engine optimization), our Squarespace SEO plugin will point you in the right direction.
To spread the word about your excellent content creation skills, share the finished product on all relevant platforms, such as Twitter, Facebook, LinkedIn, etc.
Managing Your Squarespace Blog Posts
Now that you’ve gone through the steps to create a blog post, it’s time to start managing it. That means adding, editing, and deleting content and setting up categories for your posts.
Editing content.
Understandably, you may want to make some edits to already published blogs, to either remove outdated info or add updated text. Thankfully, you can do so with extreme ease.
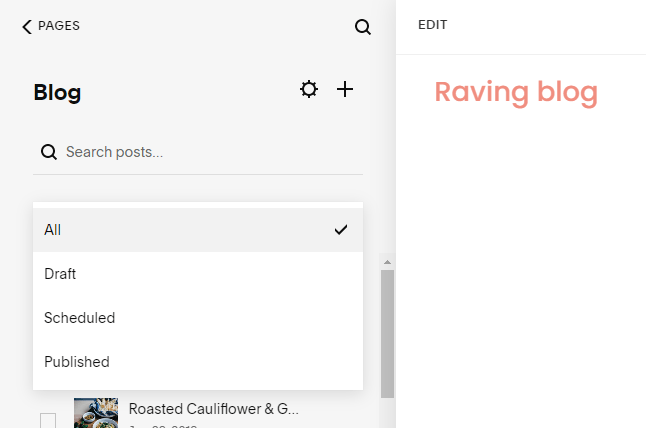
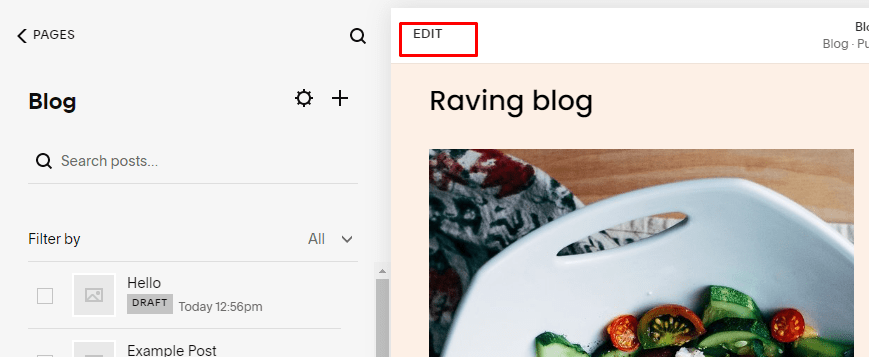
In the “Individual Blog Posts” section of your Squarespace account, filter either “Drafts” if you want to edit blog post drafts or “Scheduled/Published” if you want to tweak an existing blog post.
If your site isn’t published yet, check out this guide on publishing your site.
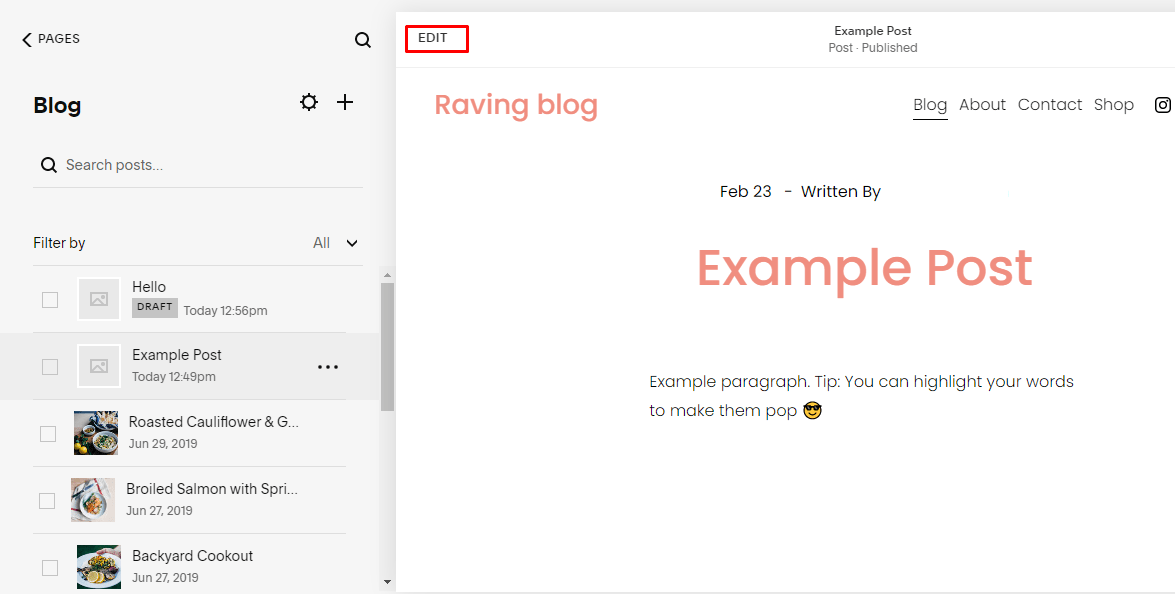
Next, click on the post and click the “EDIT” button to make your desired changes.
When working on the content of your blog post, you have several options:
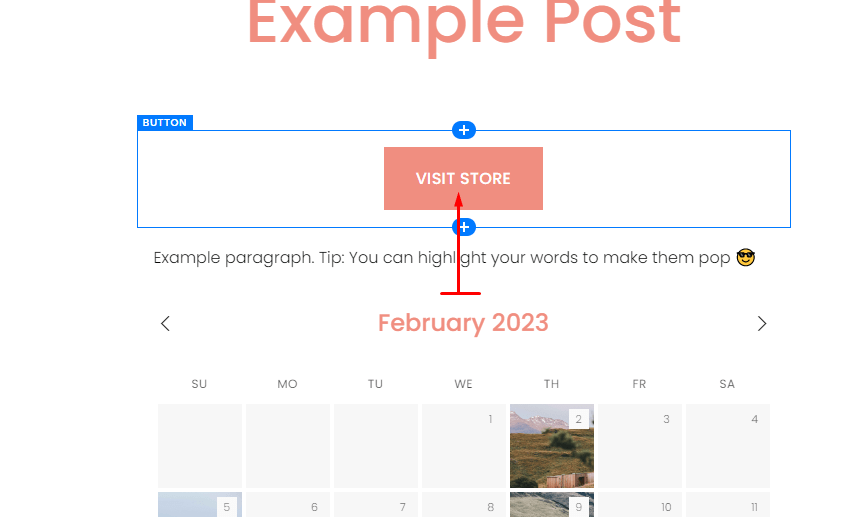
Content Blocks
You can add snippets of content—like images, videos, text, and buttons—that are formatted in a certain way by using “Content Blocks.” To add these blocks to your post, simply click on the “+” (plus sign) icon that appears when hovering over an area in the editing workspace.
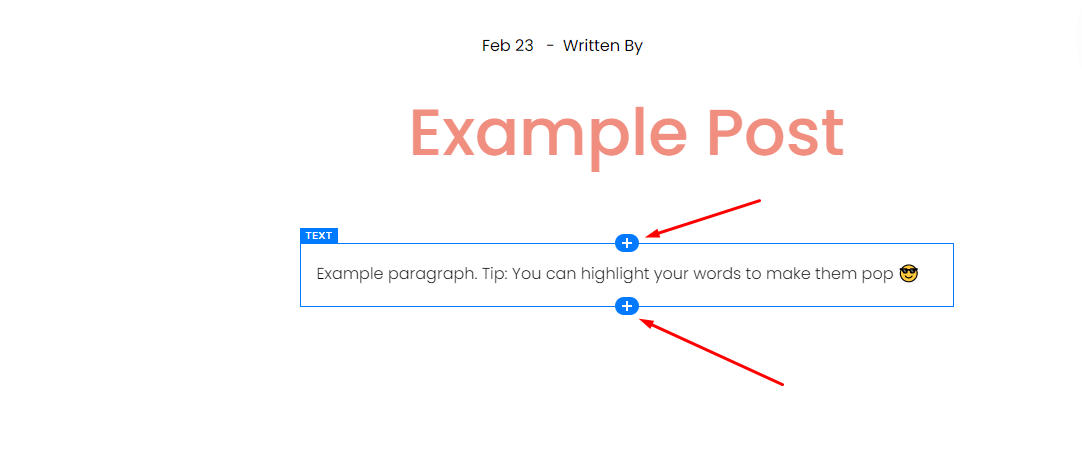
You can add these blocks to your main blog page or blog sidebar.

Rearrange Content
You can move around any part of your blog post by dragging it within the editor. To do this, just hover over an element and wait for a “Hand icon” to appear; then, simply drag it wherever you want it to be.
Deleting content.
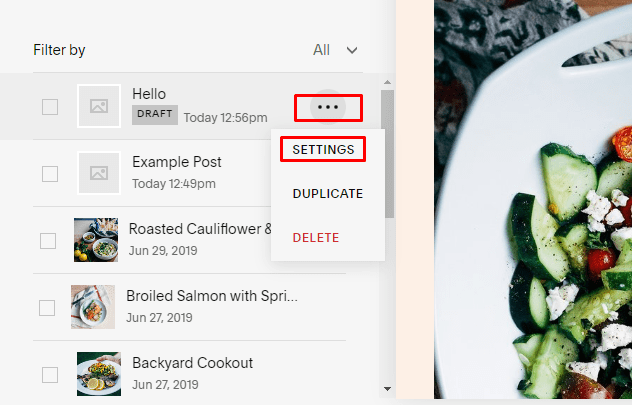
Over time, some posts will no longer be relevant or needed in your blog anymore. Squarespace lets you delete any post quickly and easily with just one click of the “DELETE” button. To do this, go to the blog lists, hover over a post, and click the “...” (ellipses) button. Then select “DELETE” from the menu.

Setting up blog categories.
It’s essential to organize your blog posts into categories for easy navigation by readers, and Squarespace makes this a breeze. When you hover over a post, click the “...” (ellipses) button and go to “SETTINGS.”

Next, head to “Options” >>> “Categories.” Add the post to a category, and save.
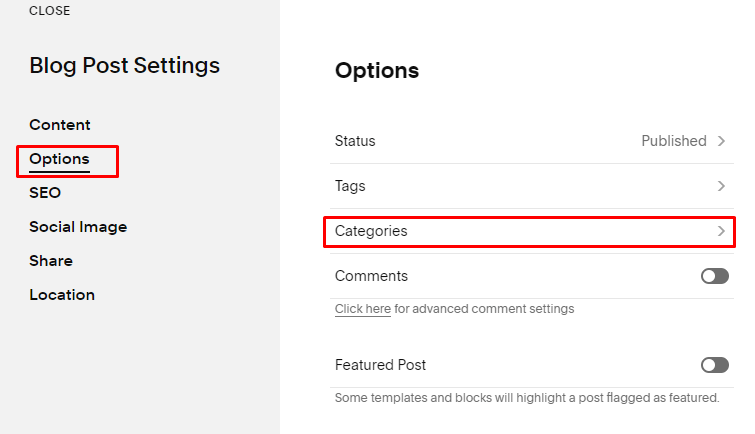
This will ensure readers can quickly find what they’re looking for, whether on a desktop or mobile device.
Comment settings.
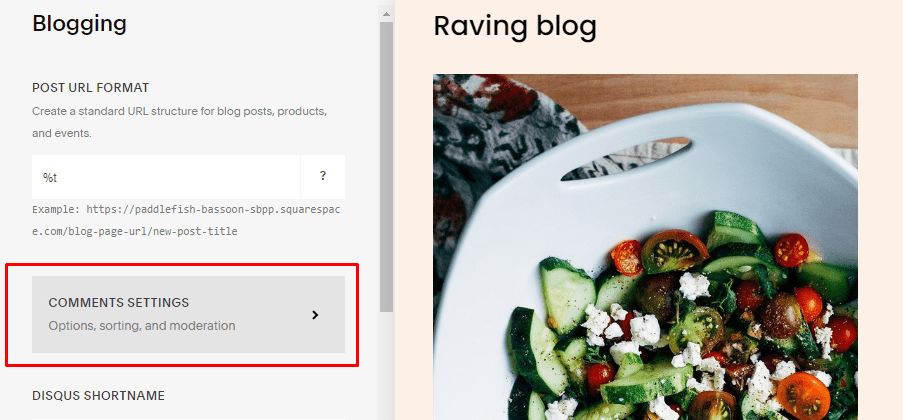
If you want your blog to be interactive and engaging, you should consider enabling comments. Comments allow readers to react to your content and start conversations. To enable comments for your blog posts, head to “Settings” >>> “Blogging” in your Squarespace account menu.

Next, scroll down to the “COMMENTS SETTINGS” section. Here, you can toggle comments on or off for all blog posts globally, which will automatically apply to any new posts you publish.
Alternatively, if you want more control over what content gets comments enabled or disabled, you can do so post-by-post. To do this, click the “...” (ellipses) button when you hover over a post from the blog lists, then select “SETTINGS.”
Next, enable or disable comments by navigating to “Options” >>> “Comments” and toggling the switch. This will override the comment settings just for that post.

It’s important to note that for your readers to leave a comment, they must have a valid Squarespace account, as this feature requires authentication. You also need to be aware of potential spam comments that may make their way onto your blog. So, be sure to check back regularly and delete any offensive comments as needed.
To fully optimize the Squarespace blog feature and get the most out of it, there are some niche settings you need to be familiar with. Not to worry, though; we’ve taken our time to break these down in the next section so you don’t miss a thing!
Exploring Squarespace Blog Page Settings
Now that you’re familiar with the basics of the Squarespace blog features let’s narrow down on those more detailed aspects. This brings us to “Squarespace Blog Post Settings.”
“How do I navigate to this aspect of your Squarespace blog menu?”, you may ask.
It’s pretty straightforward. Simply hover over a post, click the “...” (ellipses) button, and select “SETTINGS.” You’ll be greeted with several settings options for different blog customizations, which we’ll go over one after the other in the below sections.
Content Settings
Making the right tweaks to your blog post settings can make all the difference in how your blog looks to its readers. For starters, you can add a featured image and blog excerpt. This adds visual appeal to the post and allows readers to understand it without reading through it all.
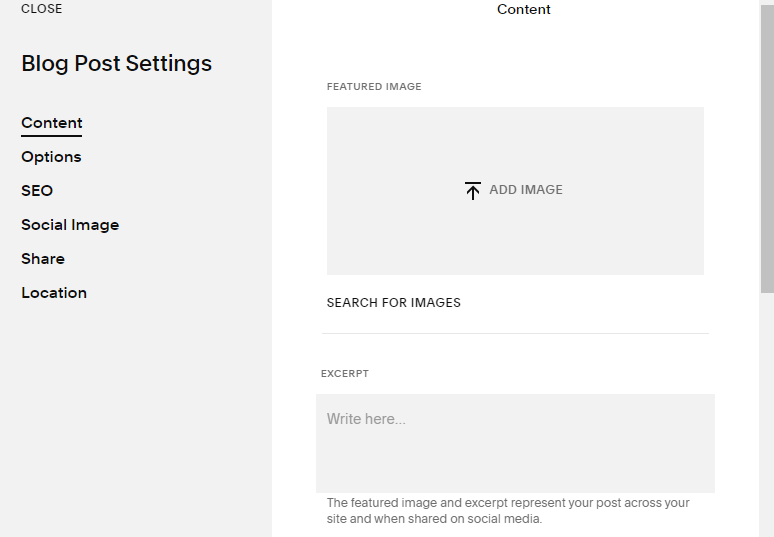
You can also customize the post URL and author, which helps you track who wrote what on your site.
If referencing an external source for your post, don’t forget to add a source URL. You can optionally link the post title from your Squarespace blog page to the source URL.
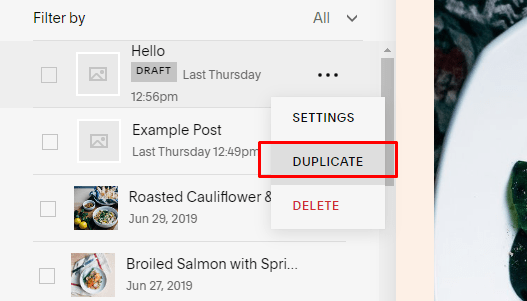
Lastly, if you want to keep a copy of a post in case anything goes wrong or gets deleted, this is also possible. To do this, click the “...” (ellipses) button when you hover over a post from the blog lists, then select “DUPLICATE.”
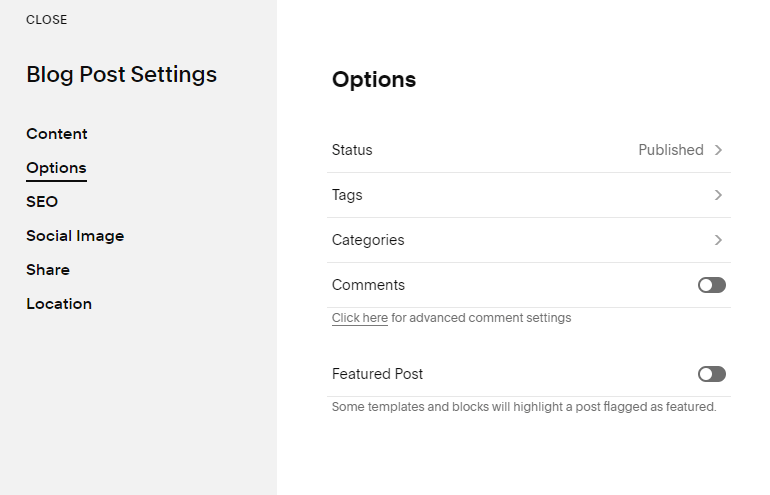
Options
This section presents several customization options. For example, under “Status,” you can change the post to draft, scheduled, needs review, or published. You can also set the scheduled date here if you want to schedule the post.
If you scroll down further on the page, you’ll see a few more options. For example, you can add tags with the “Tags” option, place blogs in categories with the “Categories” option, enable comments, and make a blog appear under “Featured posts.” All of these are great ways to make your post stand out!
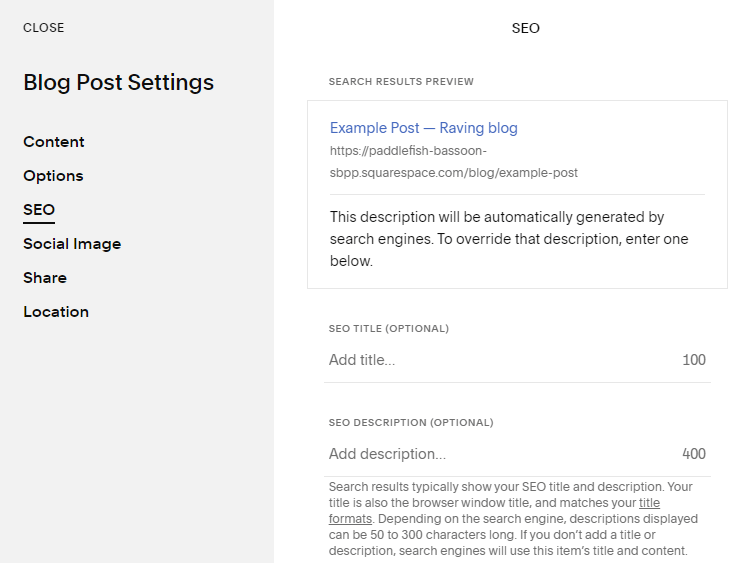
SEO
Before we get into the nitty-gritty of SEO, let’s define a few key terms:
SEO Title: Also known as meta title, this is what’s shown on browser tabs and search engine result pages (SERPs), denoting a web page’s topic. Its ideal length is 50–60 characters.
SEO Description: Also referred to as meta description, this is also displayed on SERPs, just beneath the SEO title, and informs readers of what the web page is about. Think of it as a short summary of the web page’s content that should incite readers to click through. Endeavor to keep this within the 155–160 character length.
Keywords: These are basically topics and ideas that indicate what a web page’s content is about. They’re those words and phrases that people enter into search engines when looking up information about a topic. They’re seamlessly and naturally integrated into content to boost search engine rankings for that content.
With that out of the way, let’s get to the main thing!
Managing your blog post’s SEO settings is integral to blogging on Squarespace, as it can help enhance your blog’s visibility in SERPs — we previously mentioned how much SEO alone helps drive traffic to blogs. In the SEO tab, you can adjust the SEO title and description fields to achieve your desired search engine optimization benefits.
If your blog post is aimed at a specific keyword, integrate it naturally into the SEO title. This signals to Google that this post is relevant to that search term. You can then use the SEO description field to add more information about the post displayed on search engine results pages (SERPs).
Our Squarespace SEO checklist will come in quite handy here, especially with respect to the SEO title and SEO description character count limit, as well as how to ensure seamless keyword integration into these two texts.
If you’d rather someone else do it for you, get in touch with us, the Squarespace SEO expert agency.
Social Image
Sharing a post on social media will create a social card with an image of your choice. In the “Blog Settings” >>> “Social Image” section, you can choose what image displays when you share it.
When creating your social card, be sure to select an original and high-quality image that captures the essence of what the post is about. This will push those viewing it on social media to click through.

Share
The “Share” section allows you to create an email draft to share your post with any contacts you think may be interested. You can quickly and easily customize it with a personal message, change the subject line, and add some tags.
You can also connect your social media accounts here, allowing you to share your new content for a wider audience reach without any extra effort.
Location
You can also enter your location in the “Blog Post Settings” section. In other words, you can specify the address you’re publishing from, which can help with your post’s SEO and page ranking. To add a location, just click “Specify a location” and enter the street name, city, and state or zip code of where you’re writing from.
Note that if you add a location to your post, it’ll be visible in the search engine results. So, make sure to put in an accurate address that reflects your whereabouts.
Optimizing Your Squarespace Blog for SEO
You can increase your blog’s online visibility by optimizing it for SEO — nearly 3 out of 4 bloggers claim SEO brings the most traffic to their blog website. Namely, adding keywords and metadata to your blog posts can help them appear higher on search engine results pages (SERPs). And by getting your website seen more, you’ll get more followers and readers.
Stick to the below tips to get the best out of your SEO actions:
Using Our Squarespace SEO Plugin
Compared to other content management system (CMS) platforms like WordPress, Squarespace isn’t the best for SEO, as explained in our in-depth guide on WordPress vs. Squarespace. For instance, only 15.1% of Squarespace domains boast organic traffic, compared to WordPress’s 45.5%.
Hence, we’ve created a SEO plugin for Squarespace to help ensure your Squarespace blog is optimized for SEO and competes with websites built on other CMS platforms. This plugin makes adding meta titles, descriptions, and alt tags for images easy, helping you rank higher on Google and other search engines.
This handy SEO tool also checks for broken links, keyword cannibalization, and dead content. Additionally, you may glean competitor insights using this plugin. Best of all, you’ll be able to make all of these edits from one handy dashboard — so you don’t have to chase after each page of your blog one by one.
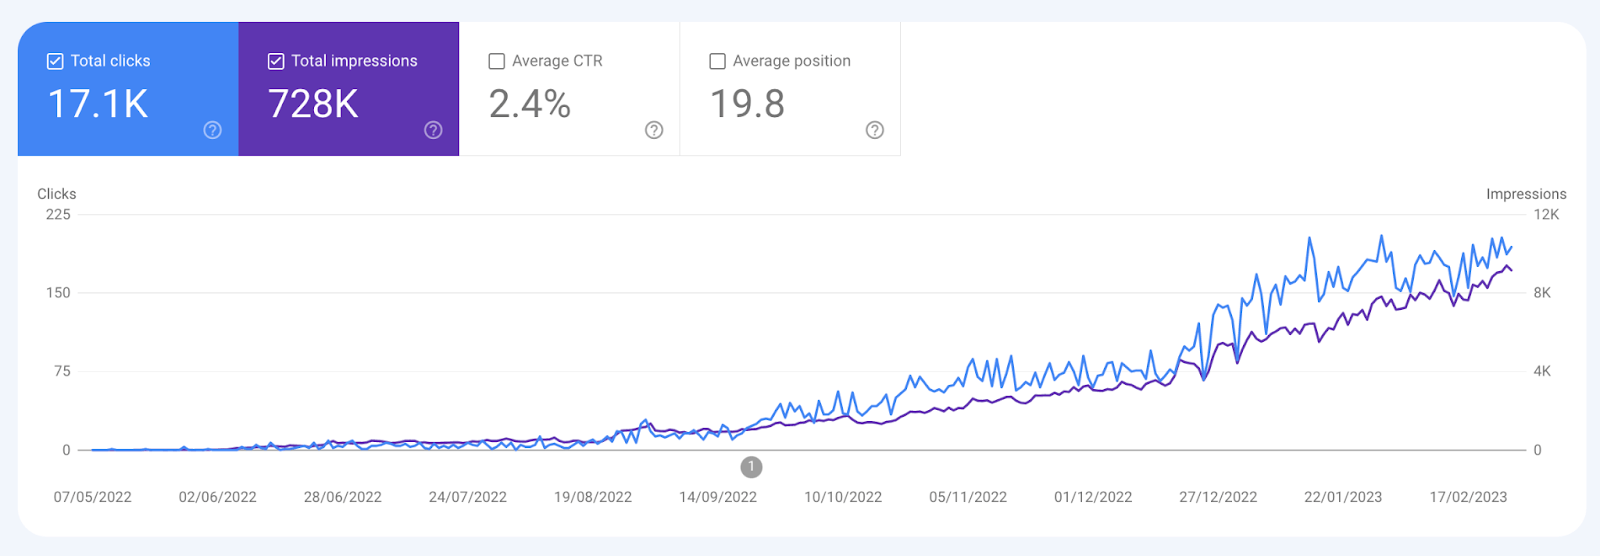
As a case study, see the image below showcasing how SEOSpace’s Founder, Henry Purchase, used the SEO plugin for Squarespace to grow his Squarespace blog, A Couple Things To Do, from zero to over 5,000 organic clicks a month. So, we definitely know what we’re talking about when it comes to anything Squarespace SEO!
Using Our Expert Squarespace SEO Tips
We’ve also compiled a list of expert Squarespace SEO tips to help ensure your blog ranks high in SERPs. From keyword research and content promotion to image optimization and internal linking, you can do many simple fixes to boost your blogs in the SERPs and create a successful blogging empire.
Following the Best SEO Practices
You must also follow the most recent SEO trends. In this regard, our Squarespace SEO checklist is highly beneficial for ranking blogs higher in search results. We provide comprehensive guidelines and strategies to optimize various aspects of a blog. By following this checklist, you can ensure that your content is optimized for search engines and, therefore, more likely to appear in the top results when people search for relevant keywords.
There’s also our online SEOSpace community where we’re constantly providing valuable answers to Squarespace SEO queries, so be sure to check it out.
Squarespace How to Blog - The Features You’ll Love
If you use Squarespace to craft your blog posts, it offers some fantastic features, some of which you may not be aware of.
Here’s what you can do to make the most of your blog:
Scheduling
Creating and scheduling blogs in advance is super straightforward on Squarespace. The easy-to-use calendar feature allows you to plan blog posts and take a break from content creation without losing momentum.
Integrations
Squarespace integrates flawlessly with other applications like Google Analytics, Mailchimp, and Zapier — all practical ways of automating the process of data collection, email capture, and content sharing, respectively.
You don’t have to add custom code for this to work, and Squarespace will automatically generate your sitemap.
RSS Feeds
Don’t miss out on new subscribers or readers with RSS (really simple syndication) feeds. This feature lets subscribers know as soon as a new post or page is published. It’s a great way to draw attention to your site and grow your community — even when you step away from the platform for a while.
Newsletter Blocks
Entice your readers to sign up for your newsletter with sleek Squarespace newsletter blocks embedded into your posts. You can customize the block’s look and feel and add an optional call-to-action (CTA) button for added impact.
Beautiful Templates
Squarespace offers a wide range of modern and stylish templates that are fully customizable. These templates are designed to make your content look visually appealing and professional.
Easy-to-Use Editor
Squarespace’s drag-and-drop editor makes it easy to create and publish blog posts without any technical knowledge. Namely, the editor lets you format your text and add images, videos, and other multimedia content.
Mobile Optimization
All Squarespace templates are optimized for mobile devices, so your blog will look great on any device. This is vital, considering that 92.1% of internet users visit the web via mobile devices and that 77% of internet users read blogs routinely.
Social Media Integration
Squarespace makes it easy to share your blog posts on social media. You can also add social media buttons to your blog to encourage readers to share your content.
Analytics
Squarespace includes built-in analytics that can help you track your blog’s performance. You can see how many people visit your blog, which pages are the most popular, and other valuable insights.
If you prefer to us Google Analytics, make sure GA is connected to your Squarespace website.
E-Commerce Integration
If you want to sell products on your blog, Squarespace includes e-commerce integration, making adding a store to your site easy.
What’s more, you can also transfer from Shopify to Squarespace if you really want to maximise your return.
Custom Domain Name
Squarespace allows you to use a unique domain name for your blog, which can help you build your brand and improve your search engine rankings.
Automatic Backups
Squarespace automatically backs up your blog every 24 hours, so you don’t have to worry about losing your content if something goes wrong.
Overall, Squarespace’s blog features make it an excellent choice for bloggers who want a professional-looking blog without much technical knowledge or experience.
Frequently Asked Questions About How to Blog on Squarespace
Is Squarespace free for blogging?
Squarespace offers a free trial period of 14 days, after which you’ll need to subscribe to one of its paid plans to continue using its service. That said, Squarespace doesn’t offer a completely free plan for blogging.
The CMS platform’s paid plans start at $16 per month (when billed annually) for the “Personal” plan, which includes unlimited pages, galleries, and blogs, along with a free custom domain for your website (valid only for one first year from your annual subscription start date). However, the “Business” and “Commerce” plans offer additional features and functionality, such as advanced analytics, e-commerce capabilities, and more, but they’re priced higher.
So, while Squarespace isn’t freely accessible for blogging, their plans offer a range of features and benefits that can help you create a professional-looking blog and website.
Can you make money blogging on Squarespace?
Yes, it’s possible to make money blogging on Squarespace, although it may require some effort and strategy on your part.
There are several ways you can monetize your Squarespace blog, including:
Advertising: You can place ads on your blog and earn money from clicks or impressions. You can use ad networks like Google AdSense or Mediavine to start earning revenue from your blog.
Affiliate marketing: You can promote products or services on your blog through affiliate links and earn a commission on any resulting sales.
Sponsored posts: You can work with brands or businesses to create sponsored content for your blog, where you receive payment in exchange for featuring their product or service.
Products or services: You can sell products or services related to your blog niches, such as ebooks, courses, coaching, or physical products.
It’s important to note that building a successful blog and earning money from it takes time and effort. You must create high-quality content, build an audience, and promote your blog to attract visitors and potential customers. In this blog post, SEOSpace Founder, Henry Purchase, reveals how much money his blog, coupled with his social media, was able to generate, enough to fund travels!
How many blog pages can you have in Squarespace?
Squarespace doesn’t limit the number of blog pages you can create on your website. You can create as many blog pages as you want and organize them into categories and tags to help visitors navigate your content.
Squarespace is designed to be a content management system (CMS) that allows you to create multiple types of pages, including blog pages, regular web pages, portfolio pages, product pages, and more. With Squarespace, you can create a website with as many pages and sections as you need to showcase your content and business.
However, it’s important to note that the number of pages you have on your website can affect its performance and loading speed. For instance, while Squarespace allows you to have up to 1,000 pages (not blog pages) on any plan, the recommended limit is 400 pages for a smooth-loading website. Hence, it’s a good idea to keep your website organized and streamlined by creating only the pages you need and optimizing their content for fast loading times.
Can I add a blog to my Squarespace website?
Yes, you can easily add a blog to your Squarespace site. The CSM platform includes a built-in blogging platform that allows you to create and publish blog posts directly on your website.
Follow these steps to add a blog to your Squarespace website:
1. Log in to your Squarespace account and navigate to the “Pages” section.
2. Click the “+” (plus sign) icon to create a new page.
3. Select “Blog” from the list of page types.
4. Choose a layout for your blog page, or customize it to your liking using Squarespace’s drag-and-drop editor.
5. Start creating and publishing blog posts on your new blog page.
Once you’ve set up your blog page, you can customize its design and layout, add categories and tags to your posts, and enable comments and social sharing options to encourage engagement with your audience.
Can you have multiple blogs on Squarespace?
Yes, it’s possible to have multiple blogs on Squarespace. The CMS platform allows you to create multiple blog pages within a single website.
To create additional blog pages, you can follow these steps:
1. Log in to your Squarespace account and navigate the main menu.
2. Click on “Pages” and then the “+” (plus sign) icon to add a new page.
3. Choose “Blog” as the page type.
4. Name the new blog page and customize its settings as desired.
5. Click “Save” to create the new blog page.
You can repeat these steps to create multiple blog pages on your Squarespace website. You can also customize the design and layout of each blog page to give it a unique look and feel.
How do I add a blog block in Squarespace?
To add a blog block in Squarespace, follow these steps:
1. Log in to your Squarespace account and navigate to the particular page where you intend to add the blog block.
2. Click on the page editor’s “EDIT” button.
3. Hover over a section, and click “+ ADD BLOCK.”

4. Select any block from the options presented, and customize it to your preference.

Once you’ve added the blog block to your page, you can preview your changes and make additional edits as needed. Remember to save your changes before leaving the page editor.
Wrapping It Up
Creating a blog on Squarespace is a reasonably straightforward process, regardless of whether you’re an experienced blogger or just starting. By following the step-by-step guide in this post and the accompanying information provided, you’re well on your way to creating a successful blog with Squarespace.
The best part about blogging on Squarespace is that you can design the look and feel of your blog however you’d like. You can easily customize your blog’s design, layout, and content to your liking. You can also utilize our powerful Squarespace SEO plugin to help boost your blog’s visibility.
Are you ready to start blogging on Squarespace? Get started today, and take advantage of the platform’s full potential. And if you want to get the best from your blog, consider getting a free website evaluation/audit today.